stewartpatterns.com
  • Home
  • Stewart Patterns blog
  • Big Ben
  • NYC work
  • Custom Bronze Hardware
  • WCTC test page

#25: building big ben: heading for the foundry

14/7/2014

 
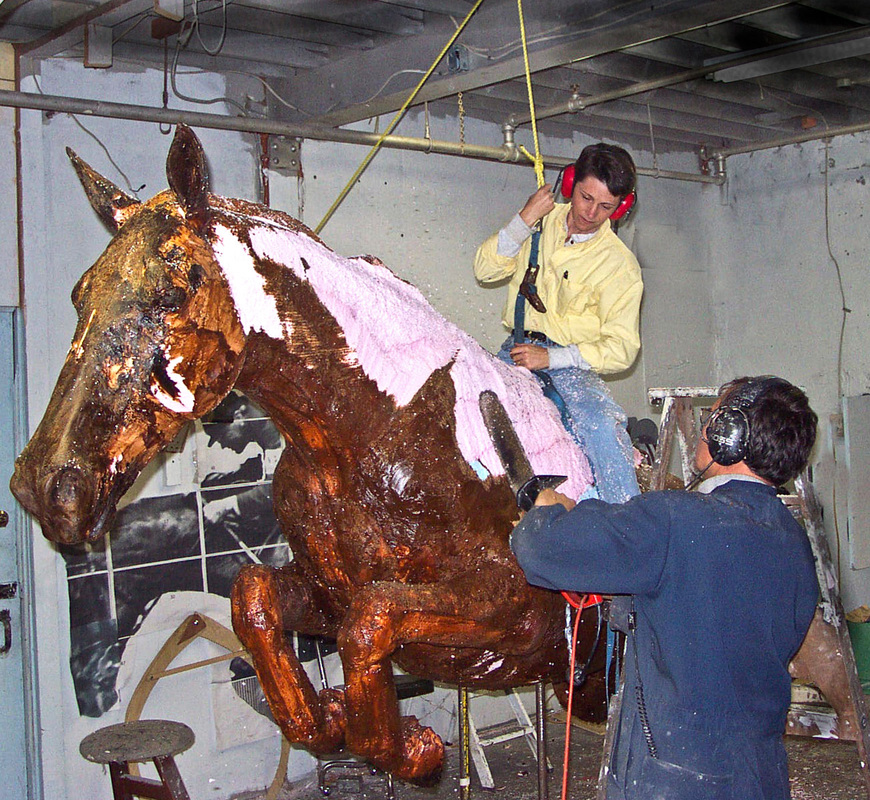
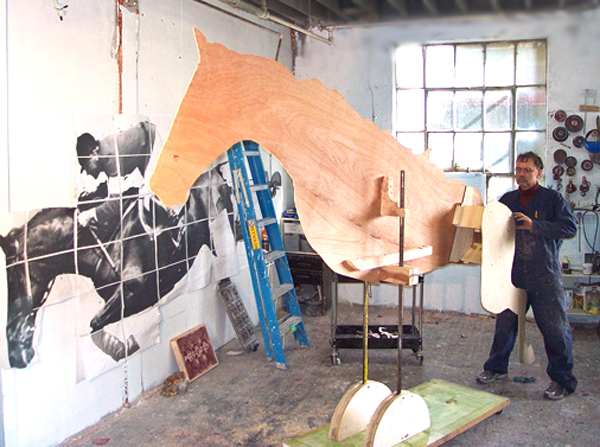
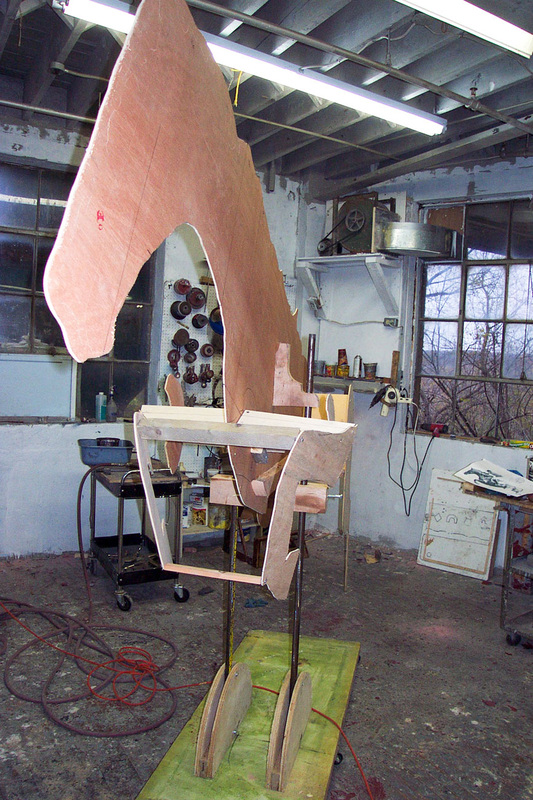
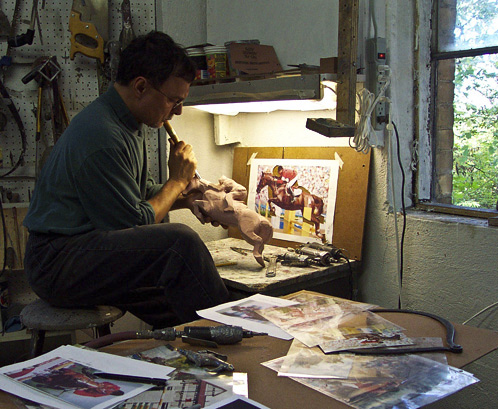
When my colleagues left, Ben perfect, Ian perfect, I installed the tack and called Marcus at Artcast. He was to arrive the next day to take the wax master to the foundry. What to do with the free day?

Here's what I did:
@stewartpatterns Stewart Smith finishes Big Ben sculpture
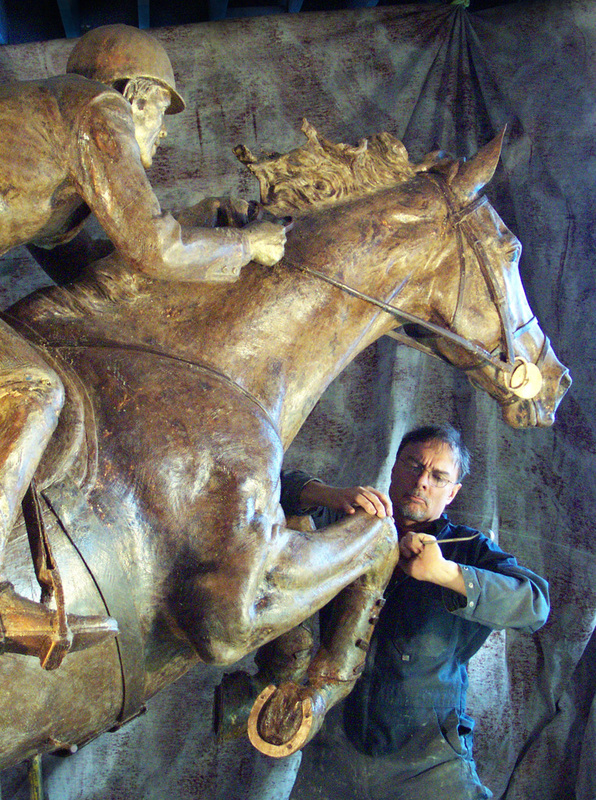
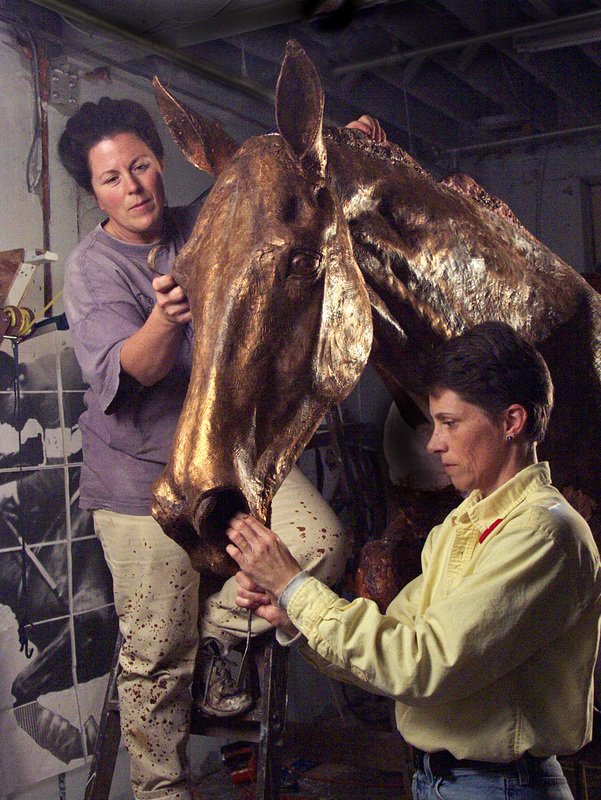
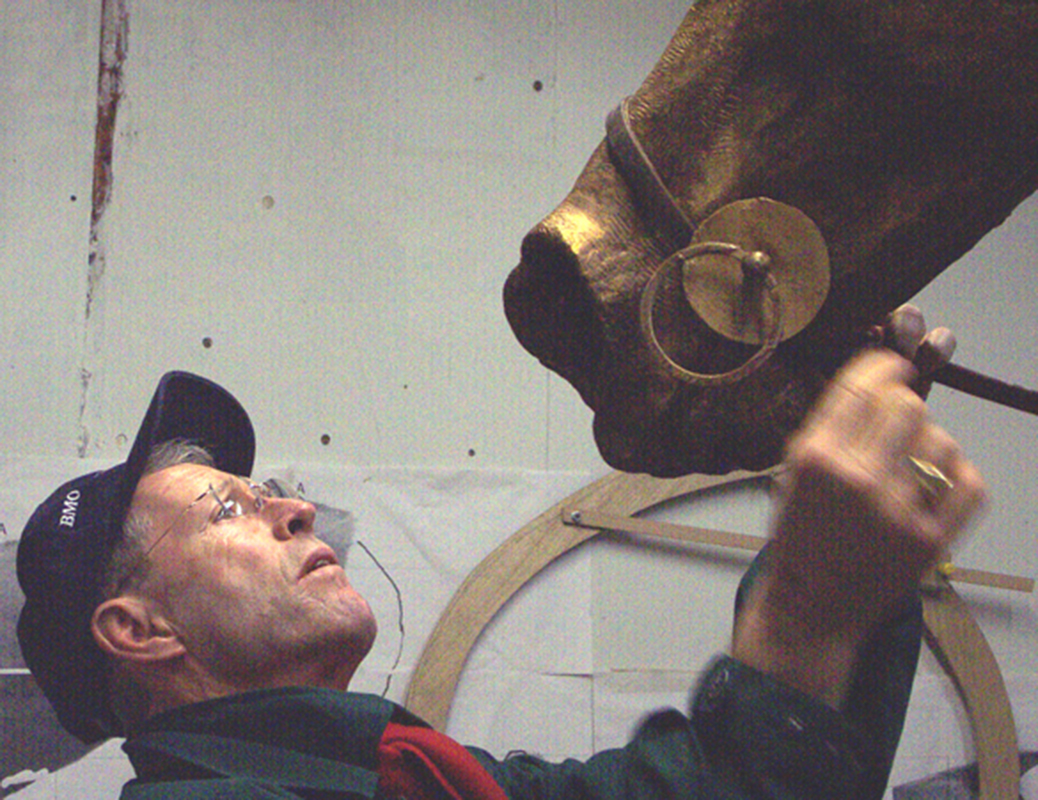
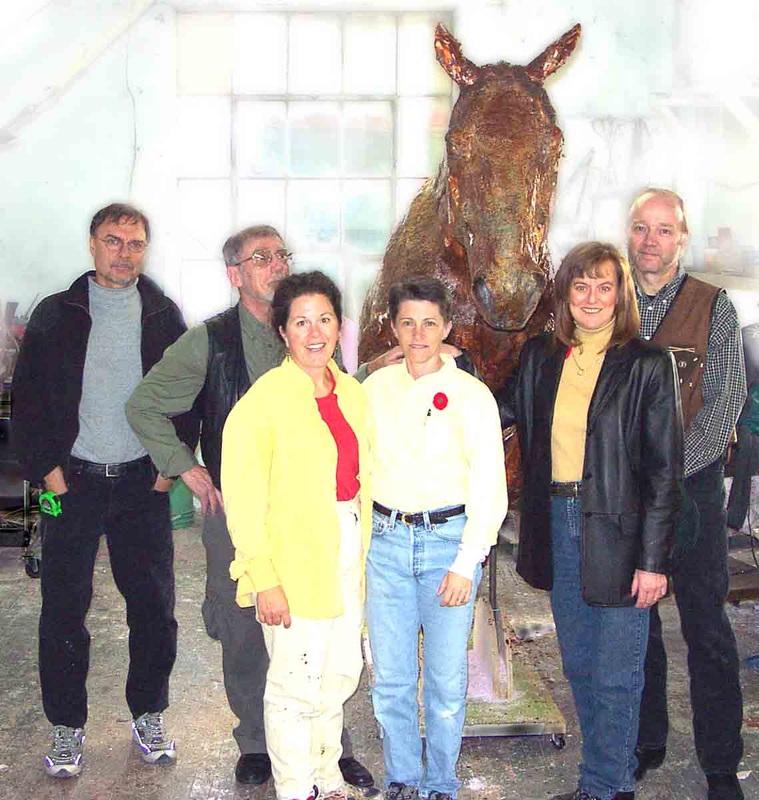
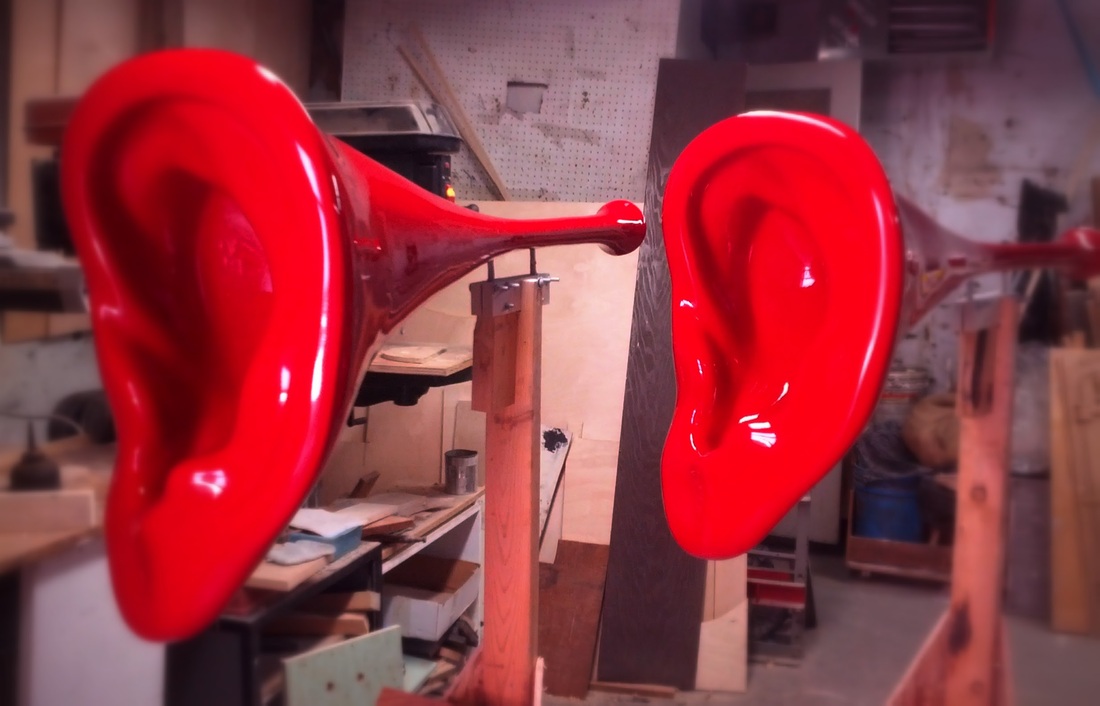
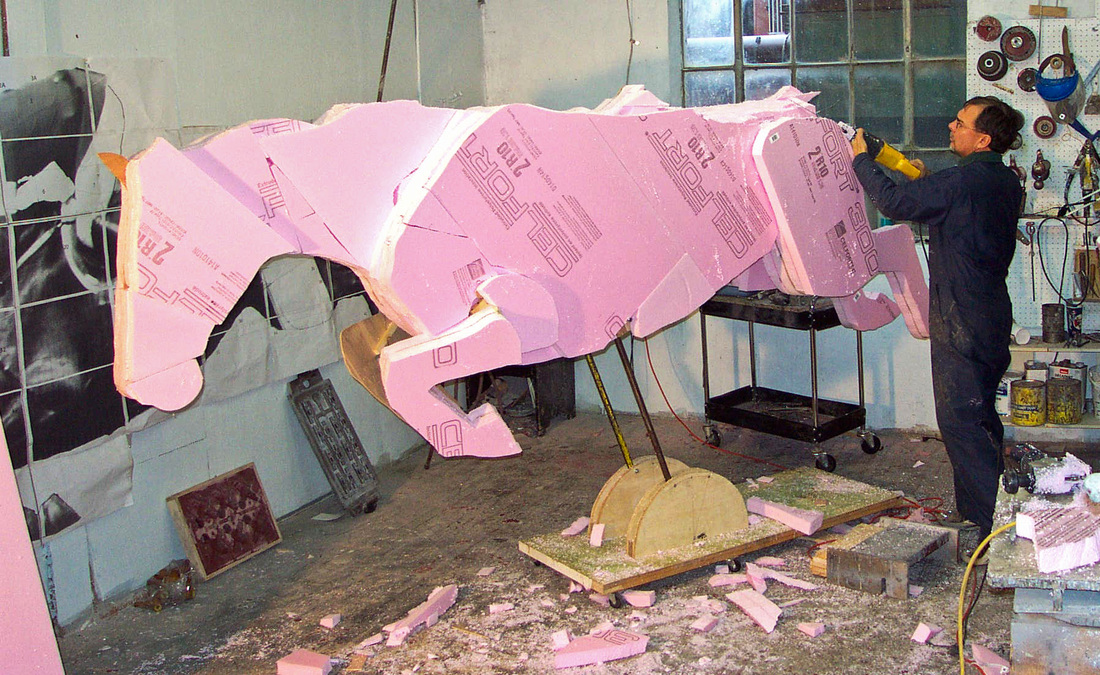
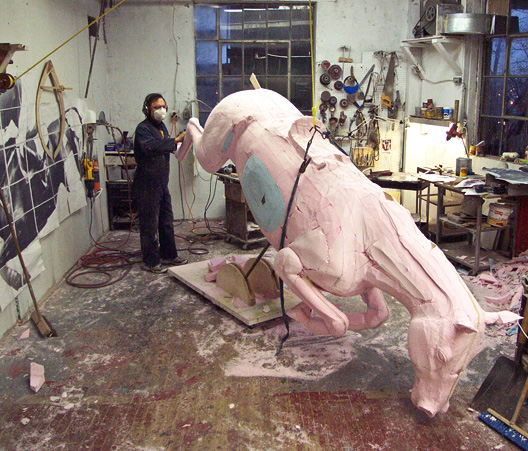
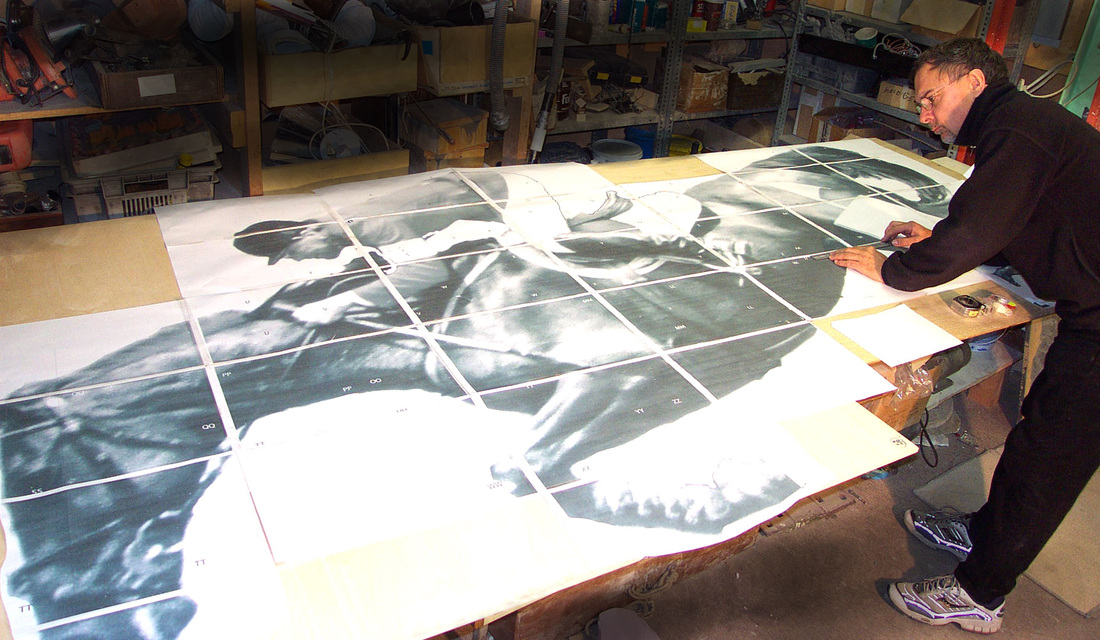
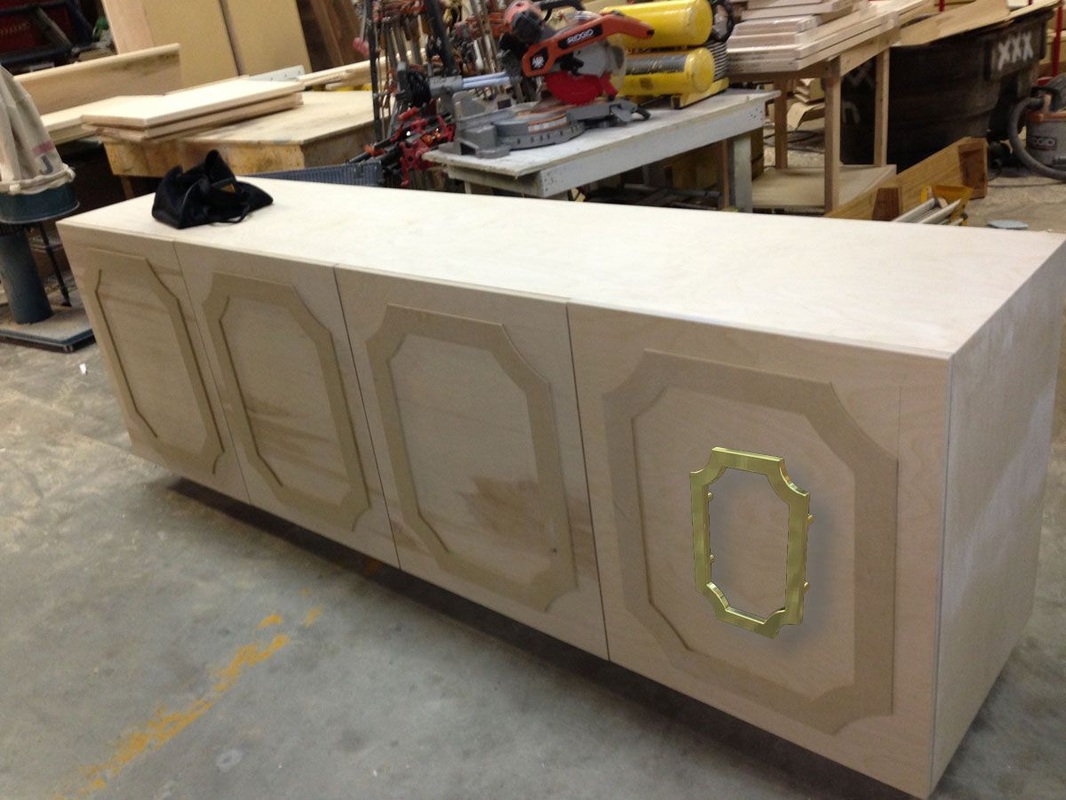
I took some hours, put up a big theatrical backdrop that I had around, put the camera on a tripod, and started taking pictures. I figured that it wouldn't hurt to hack together some propaganda, like a politician in front of a new stadium, taking credit for the whole thing. We know that this was a cooperative project. A picture is worth a thousand words, some of them true.
Marcus arrived in an amazingly small van. This wax master was 12 feet long, huge, with great bulk. I wasn't really around for the cutup. Marcus wielded his Japanese saw, its fine blade slicing through wax, styro and plywood with some ease. I don't think he was here more than 40 minutes. All that work was cut into pieces and hauled away. Yikes, I'm glad I didn't see that.

A few weeks after my studio was cleared, I was asked to make a visit to the foundry. Somebody was making a video. 
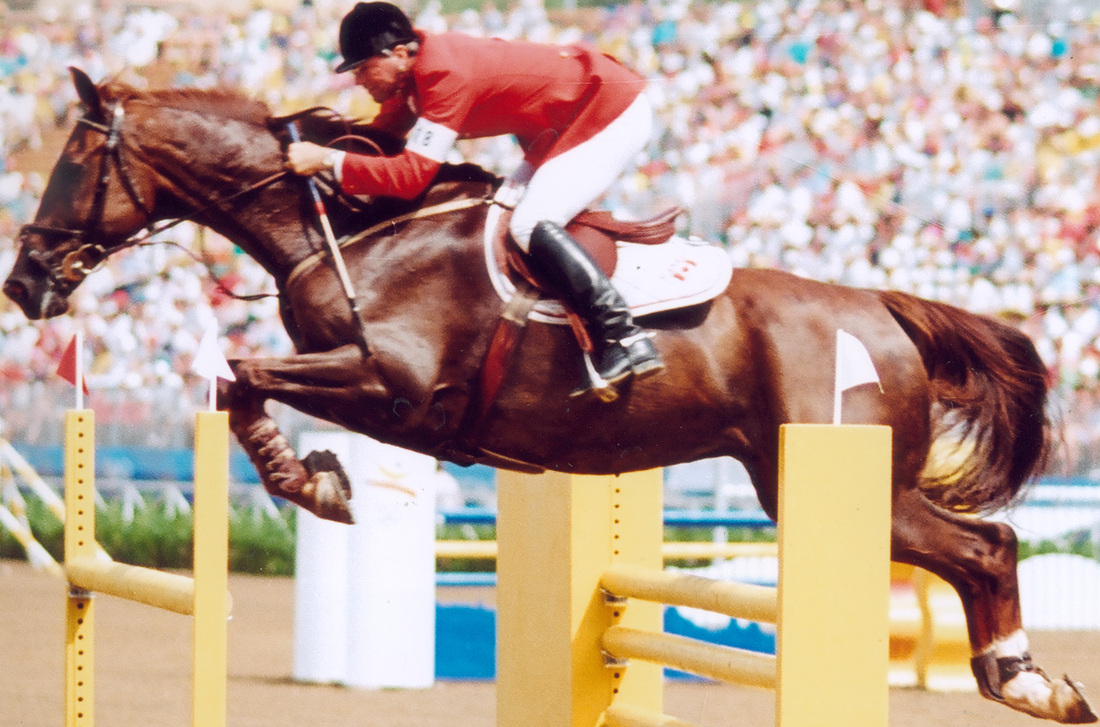
It turned out to be Spruce Meadows, a Calgary equestrian centre, known to anybody who has ever shovelled out a horse stall. I guess this video has gone out around the world. 

Horse People are not fooled, though. This whole gig was about an amazing horse, not about sculptors.

I never heard from Spruce Meadows again. I wouldn't have missed a moment of this whole adventure, including the unveiling, coming up in the last instalment.

#24: Building Big Ben: with angels on board

13/7/2014

 
Maybe it's the decade that has passed since this work was done, but I don't remember how my equestrian angels arrived. I've known Ruth Abernethy for quite some time. She lives nearby. Ruth is a world-class sculptor and portraitist. At any rate, she appeared in my studio just when I needed her. The model really needed a perfect wax skin that looked just like Big Ben.

Ruth's sister, Jean Abernethy, was Monty Roberts' illustrator. Monty "The Man Who Listens to Horses" Roberts. Jean is an accomplished artist and rider. We brought her up from her home in Atlanta for the weeks required to understand what was Ben, and what wasn't. 

That this amazing pair of sisters arrived at the perfect moment will remain a mystery to me. Perhaps Ruth could sense me floundering away from her studio 10 km away. She arrived. Jean arrived. Ben happened.
Picture
I am carving away at Ben with Jean's guidance. When the surface got close to where it should be, Jean would close her eyes and let her hands tell us where to go. It was amazing.
Picture
Ruth and Jean spent many hours just working on the ears. Jean insisted that this was one of the keys to Ben. I stood back, marvelled, and roughed in the figure of Ian, well out of the way.
Picture
Ruth working her magic over the whole surface of Ben. She's a wizard in wax, working with great efficiency and fluidity.
Picture
A favourite photo, the sisters slaving away far into the evening. I suspect that I could have charged Jean to do this work, but I did pay her. It was hard to get her to go home at night.
Picture
The big moment, when Ian Millar and his wife, Lynn zoomed in, quickly approved of where we were, and spent some time playing with the wax tack that I'd made available. The only change Ian wanted was where we'd carved Ben's feet. We'd violated rule one, cutting into the plywood template that defined everything. It was a lovely moment, seeing Ian and Lynn light up with the vision of Big Ben, appearing again in wax.
Picture
The team, from left to right, me, Eric Koespel, owner of Artcast, Ruth Abernethy, Jean Abernethy, Lynda and Tony Hendricks, the team leaders from Perth, Ontario.
There was still a ton of work to do, many details to finish, and the rider, Ian, to get carved and fitted. And all the tack to install. Still, it was a relief to get approvals from those that needed to approve, especially Ian. I suspect that there were celebrations for a short time, some extra sleep, and a libation.

Weekend Scmeekend, The Studio Beckons

12/7/2014

 
this is not a whine, honest. I might have been caught playing during the week, maybe gardening, maybe strolling about town on a beautiful afternoon with my honey and an ice cream cone. So, on a lovely afternoon, I'm here with closeup glasses carving a soldier who is about 28mm high.
Picture
...and worrying a bit about damaging the ears that lurk here, begging to be knocked about, or scratched or otherwise embarrassed. Very red ears. I'm waiting for the welder to deliver the bases for these. It could be a couple of weeks, this worry. And it looks like I have a 7 1/2 foot clay figure coming in. Probably a clumsy one, too. One worries sometimes.
Picture

#23 Building big ben, part Two

11/7/2014

 
The work volume in my studio had always fluctuated from zero to overwhelming, and never predicable. For years, though, I had regular industrial customers that seemed to show up almost daily with projects and problems, most of which I would do immediately, often priced at time and materials. It made a great baseline from which to do the crazier projects and live some semblance of a normal life. Still, a project like Big Ben is a 1500 hour elephant dropped into a small life. Things get a bit weird, customers get stalled, holidays put off, friends ignored. Heady times.

After blowing up the photo to life size, I traced the outline onto a couple of sheets of 6mm plywood, joining the pieces with a few strips of other wood. The point of the construction was to make it all capable of being burned out, as this was to be cut into pieces and cast in lost wax.  Where possible, I glued wood together.

Picture
Adding extensions to the silhouette. I made new silhouettes of the legs to include internal joints, then fastened these to the extensions.
I next built a rolling stand that would allow me to move the whole master up and down, and tilting forward and back to allow for work on detail without a ladder.  I joined the plywood silhouette to the stand to allow for some movement. 

My studio was only 2000 sq ft, with room required for machinery and lots of other activities, so the rolling feature is something I add to everything possible in the studio. At the time, I had access to an adjoining empty room, so, in short order, I could swing all my storage and work benches into that room, leaving a blank space of about 600 sq ft with windows two sides. It’s been great, working every day on the bank of a lovely, treed river, high enough up to catch breezes.

Picture
Roughly the view from my studio, down the Nith River, in the heart of New Hamburg, Ontario. The river will rage at times, and sleep others.
Picture
Another view of the internal structure, showing that roller base that allows the whole thing to be raised or tilted.
My cutout taken directly from the photo was my standard edge. I knew that, regardless of the third dimension, that all details had to match this pretty closely. It took a lot of staring at photos, a lot of measuring, to determine how far to offset the legs, establish hip bone placement, and even the width of the head. I roughed these dimensions in and mounted the legs onto the extensions. Now I could start gluing on Styrofoam. I don’t know how many boxes of hot glue I used. A lot. I had two guns on the go at all times.

Picture
Most of the styro has been glued on. The plywood cutout is buried along the edges of the styro. If I cut into the wood at any time, I'd be cutting off part of Big Ben. I'm starting to use my recipro saw.
Did I mention that this was fun? It really was, building a horse. It probably took no more than a few days to go from the outline to the rough volume of Big Ben. It feels great to create this size of an object as directly as possible.

Next step was to grab saws, an electric chain saw, a recipro saw, and my 4 ½” grinder with 20-grit discs. All kinds of effort with large muscle groups, a few brain cells engaged, styro beads everywhere, especially in the corners of the eyes and in the underwear. Lots of noise, of sturm und drang. Some pauses, staring at photos, wondering what the heck was happening between skin and bone.
Picture
Big Ben tipped over to allow me to get at the back legs. I'll bet there are a few farriers out there that would love to have this feature built into real horses.
I didn’t pause very long to consider how I was going to learn equine anatomy in a week. Not knowing is a kind of special skill. I just blasted away until I couldn’t see any more what was going on. At that point, I melted a pail of cheap wax, hoping that a more reflective surface would reveal the true Big Ben lurking somewhere. It didn’t. It just made the studio smell bad for awhile.

I needed a miracle, I guess. Without knowing what I needed. One arrived.
Or two.

Continued in Part Three.

#22 Building Big Ben: a life-sized equestrian statue

10/7/2014

 
PART ONE: THE CHALLENGE

It used to be that the culmination of a sculptor's career was his chance to do full-sized horses in bronze. Since Roman times, every Tsar, Archduke and Admiral has placed himself on a horse on a pedestal. It's a meme, I guess. Just something you have to do when you control the lives of millions. Here are a few examples. There is a great slideshow of similar sculptures here.
The town of Perth, Ontario population 5840, was put on the map of international show jumping when Big Ben and Ian Millar started winning every prize available. Some years after Big Ben's death, Tony and Lynne Hendricks, local business people, organized the resources of the area residents to erect a life-sized bronze of Big Ben. They hired Artcast in Georgetown, Ontario, and Artcast hired me to create this piece.

Although I had heard of this pair, I would not have been able to pick them out of a lineup of any 3 horses. I was amazed when my buddy Bart riffled through a stack of horse images I'd downloaded and picked out a couple of Big Ben. It was my first bit of understanding what the equestrian world might look like. Still, not knowing what I didn't know, I forged ahead, hanging out with horses, sketching, studying, oblivious to the idea that some artists spend a career just studying equine physiolology.

The challenge, as I saw it, was the pose. The townspeople of Perth wanted Big Ben in full flight over a jump. This meant making a tonne of bronze fly. And a 'horse on a stick' was not going to fly.
Picture
Historically, equestrian sculpture has been limited by the weight and strength of materials. The older works featured horses with all 4 feet on the ground, or, perhaps supported by some unfortunate slave being trampled for the sake of supporting a lot of stone or bronze. In later years, internal structures could be built into the bronze shell to support a rearing horse.
I carved a quick little model of the pose and layered photos of it on top of a digital image of the jump. It took some weeks of conversations between the customer, the foundry and myself. Here's what the process looked like:
I had planned to support the sculpture on 1" diameter stainless steel rods welded to substantial pipe that represents the jump. Marcus at Artcast has long experience with this kind of engineering, and he gave the design the thumbs up.

A photo was available, one that caught Big Ben and Ian mid-flight over a jump, just what I needed to get a really accurate model for scaling all parts of the project. It's a very mechanical process at this point. Any deviation from the photo was going to be 'not Big Ben'. I was indebited to photographer Shawn Hamilton for supplying this photo. I would have been lost without it.
Picture
Big Ben, photo by Shawn Hamilton
Finally, I blew up Shawn's photo to full size, about 12 feet long (3.6m) so that I could get started. More in part 2! Whew, a bit tired just remembering. In the heat of the moment, though, on a project with this kind of visibility, there is no fatigue. Fear, excitement, focus, bewilderment, but no fatigue.
Stewart Smith in studio, working on Big Ben
Taping a number of tabloid-sized printouts together to make one big horse and rider.

#21: sometimes easy: simple projects, happy customers

9/7/2014

 
I have this long list in my "hall of shame" file, a hazard of custom work. There are many days, though, when the job simply gets done, no fuss, no great challenges. These are pleasant, the bank manager is happy. Challenge gets me out of bed, though, so there's a happy medium, somewhere. Since I'm working towards a 7 1/2 foot tall bronze man project today, I'll describe a happy, easy project.

For some time I've been a supplier to a site called Custom Made. They supply a place for the listing of odd projects of any description. Makers like me get listed as trusted suppliers. We look at job boards and quote on work. The site takes a small percentage to handle some of the trust factor, but the whole transaction happens directly between customer and supplier.

Shawn Broaddus, an interior designer and furniture designer near Atlanta, GA , wanted some custom cabinet pulls made for a credenza that she was building. She wasn't sure just what she wanted. She sent me a photo of a rough version of her project, and I sent back quick images from Rhino 3D:
Picture
I have overlaid an image of my first proposal of door pull. We went back and forth a few times on the design to get it right.
Picture
a first design
The job simply flowed along as if we'd done this for years. I sent a few more variations on this design, and it was set. Custom Made has a quoting system that works pretty well. I made the master pattern, got it cast, finished the castings, threaded the backs for holes and supplied brass bolts. Easy. I sent photos to Shawn:
stewart patterns cabinet pulls bronze
@stewartpatterns cabinet pulls custom bronze
Within the hour I had full payment via Paypal, and shipped these to Atlanta in about two days. Shawn sent back this photo fairly quickly, a happy customer. 
Picture
Custom cabinet by Shawn Broaddus, of B Design in Alpharetto, GA.
One of the great things about Custom Made is that the customer reviews are public, so prospective customers can see unbiased comments on projects, along with photos, etc. It all helps!

..., and, whew, not all projects are this easy. Hardly a day goes by when I'm not researching some technique or gizmo to help save my bacon. Today I discovered a pretty good looking 3D printer. I've tried to avoid expensive tools, preferring to job out this work, but this is getting tempting. I wasn't that long making the master pattern for Shawn's job, but this would have reduced the work to a few minutes. Hmm, maybe I have a few minutes to spare. Perhaps I love the smell of fresh wood, and don't love the smell of burning ABS?

#20: official crests, adding detail that only crickets will see

8/7/2014

 
I have done quite a number of official crests in low relief, all the way from the Canada Crest, to the RCMP, to family coats of arms. I will be given a drawing like this to work from:
Picture
I generate one leaf, copy it a number of times, then cut the copies up to fit around the circle. I carve the various elements like the deer and crown and add them to the pattern. The whole thing, perhaps 16" high, is to be cast in bronze. I have to keep metal thicknesses down to around 6mm, or 1/4". Not thicker. Not thinner. The letters are metal elements that I buy and stick on.
shilo crest for bronze casting
I spend lots of time with strong closeup glasses on, getting all the detail I can into the master. The pearls on the crown are cut into my copy mould.

 I have done so many crowns!  For years I saved all the moulds, hoping that one day I could reuse one. I never did. I threw most of them out when I downsized my studio a few years ago. These days, I would just draw one in CAD and get whatever size I needed cut CNC.

 If I had just known where this sort of work was going, perhaps I would have simply fudged some of this detail. When I found the plaque online, it appears to be on a giant sign in the middle of a field.
Picture
You see the bronze crest, right? This does seem to be visible only from perhaps 150 metres. Sigh
stewartpatterns.com
The entrance to CFB Shilo near Brandon, Manitoba.
I love the prairie! Endless skies, the Balm of Gilead poplar, even the razor-edged cold. But my bronze work here, with its great permanence, seems simply lost. Oh well, I guess I know that that delicate deer is playing somewhere in the plains with the antelope.

working small, working in the negative, a tutorial

7/7/2014

 
I often have to work quite small, with geometric shapes. If I'm to do this cheaply, I'll do it by hand, if possible. I worked for decades before CAD and CNC, so this is a trick learned over some time.

This custom hardware was commissioned by a homeowner who was building an elaborate wine cellar. These were his own bronze door latch and hinge elements. I got started in wood and wax, roughing in the details. Then I took carveable plastic moulds and carved them, in the negative. Here's the final casting:
Picture
Bronze door hardware cast in lost wax at Artcast in Georgetown, Ontario.
Here is a series of renderings that show the steps taken to get this fine detail that 'pops' off the surface.

I started with the shape of the final object and took a mould off it in plastic (fast-cast polyurethane, fairly carveable):
Picture
Then I put a small round cutter in my Dremel and cut little half-round holes into the surface of the plastic to form the grapes:
Picture
I press clay into the surface to check my shape, refining as I go. I carved stems and other lines at the same time.  When I was happy, I waxed the surface to release the final plastic copy. I mixed more plastic and poured it into the cavity, and here's what I got:
Picture
The dark blue is the final plastic copy from the intermediate plastic mould that I was carving.
I'm often done at this point, though I can continue carving into the new surface to refine detail if necessary.

Cool, huh? Thinking negatively is good sometimes...

a sweet job, bronze and more bronze

6/7/2014

 
At the end of a recession, when the bank manager wasn't being all that friendly, a sweet project came along that filled my days and financed some ski trips.

The Prince of Wales Hotel was built over 100 years ago. It has seen good days and bad. When global entrepreneur Si Wan Lai came to Niagara-on-the-Lake, the town changed. The hotel was to go from a near-relic to a rare 5 star hotel, all in less than a year. It was amazing to be part of that change.
Picture
Working with Artcast Inc,, we made drawings of one element, a sign featuring lettering and a bas relief logo. The project grew from there to take up most of 5 months of focused work, to include room numbers, room signs, a big sign over the main desk, and a number of pairs of split logos that formed door pulls, inside and out. 
Picture
This is the main entrance to the Prince of Wales in Niagara on the Lake. These custom door pulls are about 15" high. There are at least 8 pairs of these in the hotel.
Much of the signage was straightforward bronze plaque making, with that Prince of Wales logo added to most surfaces.

The door pulls, though, were a serious challenge. I had to cast separate custom stand-offs that would allow these to be mounted precisely back-to-back. The mounting had to be fairly invisible, and really strong. These huge doors were solid mahogany and custom bevelled glass.

I spent many days in Niagara with the manager of Artcast, Marcus Knoespel, installing everything. I had taken two long days in my studio practising the door pull mounting, as there was no room for mistakes here.
Picture
Artcast did a great job of highlighting the detail on these castings. They were all lost wax cast, so the work was impeccable. Over a decade later, I notice that the front door pull has been scrubbed clean by some enthusiastic employee, destroying that patina. For a night's room and board there, for my wife and me, I'd volunteer to restore that look :)
Picture
The front desk at Prince of Wales Hotel. Note the fine hand-applied detail in the ceiling.
When we arrived to install the bronze elements, there were around 250 hand-picked craftsmen working inside, feverishly trying to meet deadlines. There were plasterers applying tiny roses to the ceiling. There were painters with tiny brushes adding colour to those details. There were blacksmiths installing iron grills to the doorways of the dining room, while decorators fought to keep sparks and grit off the acres of custom-woven carpet. 

Somehow the flooring got installed rather early, exposing the huge marquetry areas and the carpets to the tramp of many hurried feet, falling tools and the scrape of ladders. I had to install a heavy bronze sign over the reception desk shown above. The granite desk top had been installed, featuring a gorgeous red figure to the stone. It was covered with a tarp, and I did stand on it for some time, struggling to find some mounting place amid the delicate wooden tracery overhead.

It was fun being part of such a to-do, making such over-the-top finery. It's not often you get paid to do your very best work for such an extended period of time.
Picture
The Prince of Wales today, much improved from it's darker days. Still, I haven't been inside since the day I finished the installation. It's not really a place for a craftsman, but a regal resting point for those who have paid much more attention to money than I ever did.

#17: Making it big, but only in feet.

27/6/2014

 
 Some time, deep in the mid-80s, I got a call from a city politician from Cambridge Ontario. A huge old oak was in the way of some progress. The tree was to be made into a sculpture to honour the community. I must have submitted a drawing. I do remember visiting the maintenance yard where the tree was stored, standing in some awe of the huge trunk.

There have been moments in past decades, recurring moments, much like Lucy's repeated football trick on Charley Brown, where I think " ha, this is IT, I've Made It." When I got the go ahead, this was my thought.

Here is the tree, lying on its side in the yard. Notice my elderly Pioneer chainsaw near the top.
Picture
and notice the chalk marking to show where the major cuts were to go. I had carved over 3000 small pieces by that point, so I guess I had some reason for confidence.
I think I might have been a few weeks running that chainsaw fairly constantly. Every few days I'd get the city employees to come with a loader to roll the tree over. 

I designed a base that would allow maximum airflow around the base of the scuplture. Wood will stand a long time as long as there is no lasting damp area.

When I figured I was done, they brought a big flatbed truck and crane. This is the morning when they dropped the scuplture in place.
Picture
I spent some hours tweaking detail with a large carving tool.
Picture
A mobile sandblasting service came in to make the surface look as if it had been there for a long time.
Picture
I've always loved Henry Moore, having spent many hours in the gallery devoted to his large plaster maquettes. It was cool to see one of his reclining figures in elm in the gallery in Chicago. So, perhaps this was my Henry Moore. I did understand that my work was 30 years behind the times, but, still, this piece seemed important.

This  was installed in a field near a mall. It was visible for some distance. As I remember, it got a small mention in the local weekly paper. That was it. That big moment. Lucy pulled the football again.

Most of 30 years later, this piece still stands:
Picture
Almost surrounded in bushes, the oak sculpture is hollow in places, but intact. I like this now. It has a timeless sense, a family standing, watching over a child into perpetuity.
<<Previous
Forward>>

    stewart smith

    I'm a woodcarver, turned sculptor, and morphed into a pattern-maker for cast metals. These days I hesitate to define my work, avoiding words like 'artist' or 'craftsman'. I just love designing and making things, keeping a bit of time free to downhill ski, paddle my kayak, and sing with my fellow choristers.

    Stewart Smith
    Stewart Patterns
    New Hamburg, On 
    email stewsnews@gmail.com

    Archives

    November 2014
    August 2014
    July 2014
    June 2014

    Categories

    All
    Bronze Tile
    Cast Aluminum
    Cast Bronze
    Cast Iron Restoration
    Cast Metal Design
    Custom Bronze Door Pull
    Custom Cast Bronze
    Custom Cast Hardware
    Custom Medals
    Digital Sculpture
    Historic Restoration
    Hollywood
    Margaret Atwood
    Memorial Bronze
    Mestrovic
    New York Parks
    Pewter Casting
    Sculpture

    RSS Feed

Powered by Create your own unique website with customizable templates.