stewartpatterns.com
  • Home
  • Stewart Patterns blog
  • Big Ben
  • NYC work
  • Custom Bronze Hardware
  • WCTC test page

#23 Building big ben, part Two

11/7/2014

 
The work volume in my studio had always fluctuated from zero to overwhelming, and never predicable. For years, though, I had regular industrial customers that seemed to show up almost daily with projects and problems, most of which I would do immediately, often priced at time and materials. It made a great baseline from which to do the crazier projects and live some semblance of a normal life. Still, a project like Big Ben is a 1500 hour elephant dropped into a small life. Things get a bit weird, customers get stalled, holidays put off, friends ignored. Heady times.

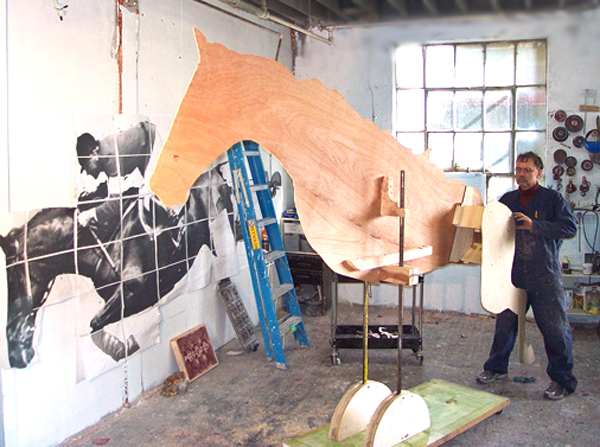
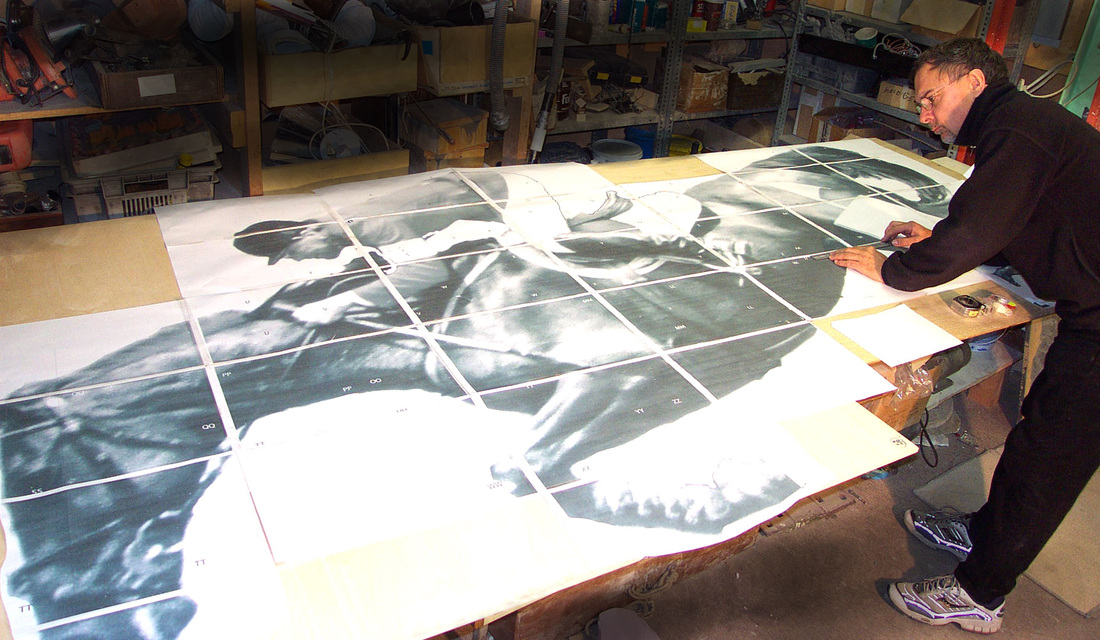
After blowing up the photo to life size, I traced the outline onto a couple of sheets of 6mm plywood, joining the pieces with a few strips of other wood. The point of the construction was to make it all capable of being burned out, as this was to be cut into pieces and cast in lost wax.  Where possible, I glued wood together.

Picture
Adding extensions to the silhouette. I made new silhouettes of the legs to include internal joints, then fastened these to the extensions.
I next built a rolling stand that would allow me to move the whole master up and down, and tilting forward and back to allow for work on detail without a ladder.  I joined the plywood silhouette to the stand to allow for some movement. 

My studio was only 2000 sq ft, with room required for machinery and lots of other activities, so the rolling feature is something I add to everything possible in the studio. At the time, I had access to an adjoining empty room, so, in short order, I could swing all my storage and work benches into that room, leaving a blank space of about 600 sq ft with windows two sides. It’s been great, working every day on the bank of a lovely, treed river, high enough up to catch breezes.

Picture
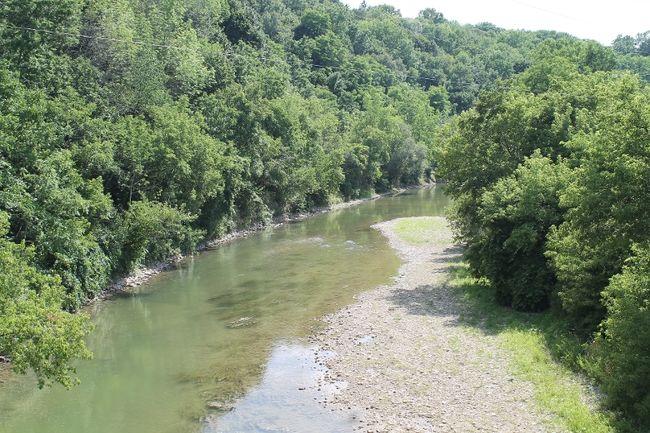
Roughly the view from my studio, down the Nith River, in the heart of New Hamburg, Ontario. The river will rage at times, and sleep others.
Picture
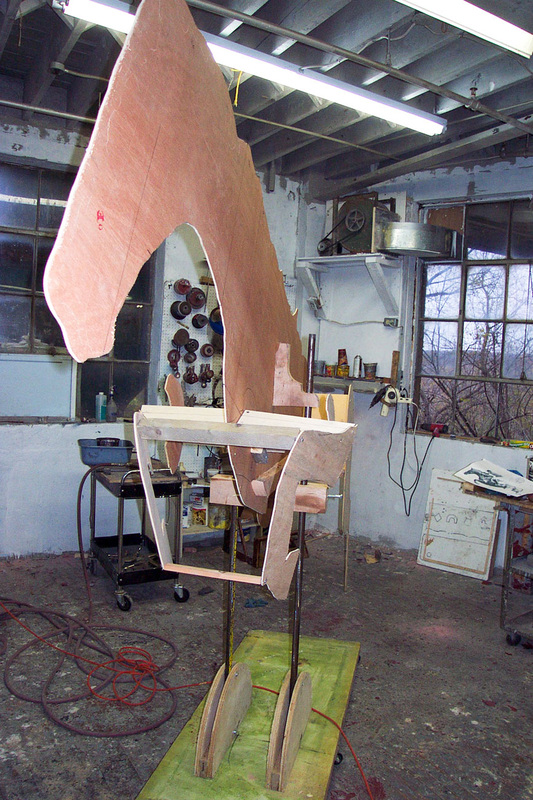
Another view of the internal structure, showing that roller base that allows the whole thing to be raised or tilted.
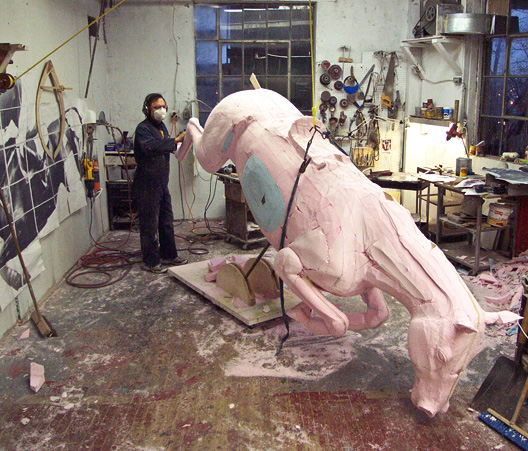
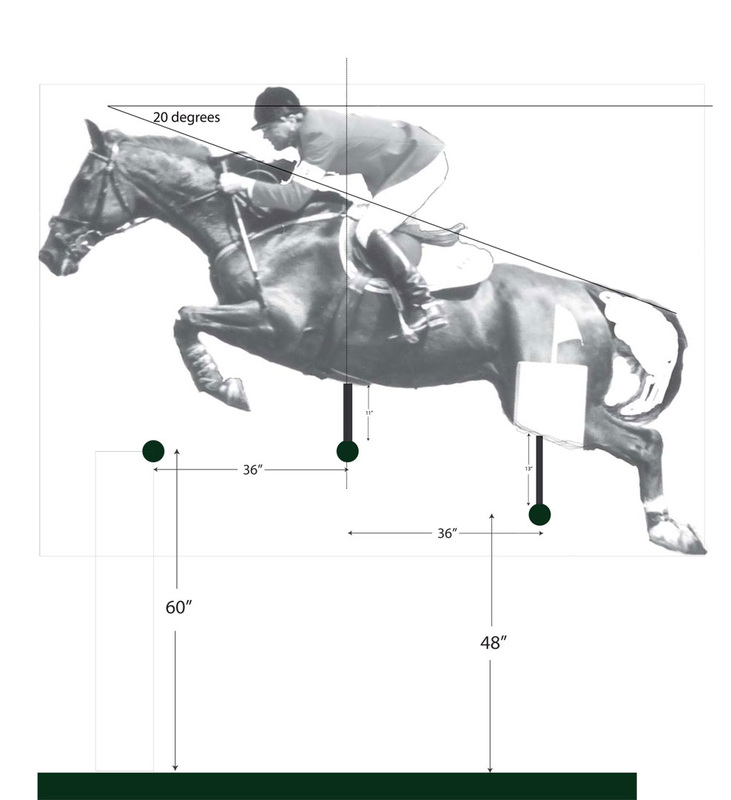
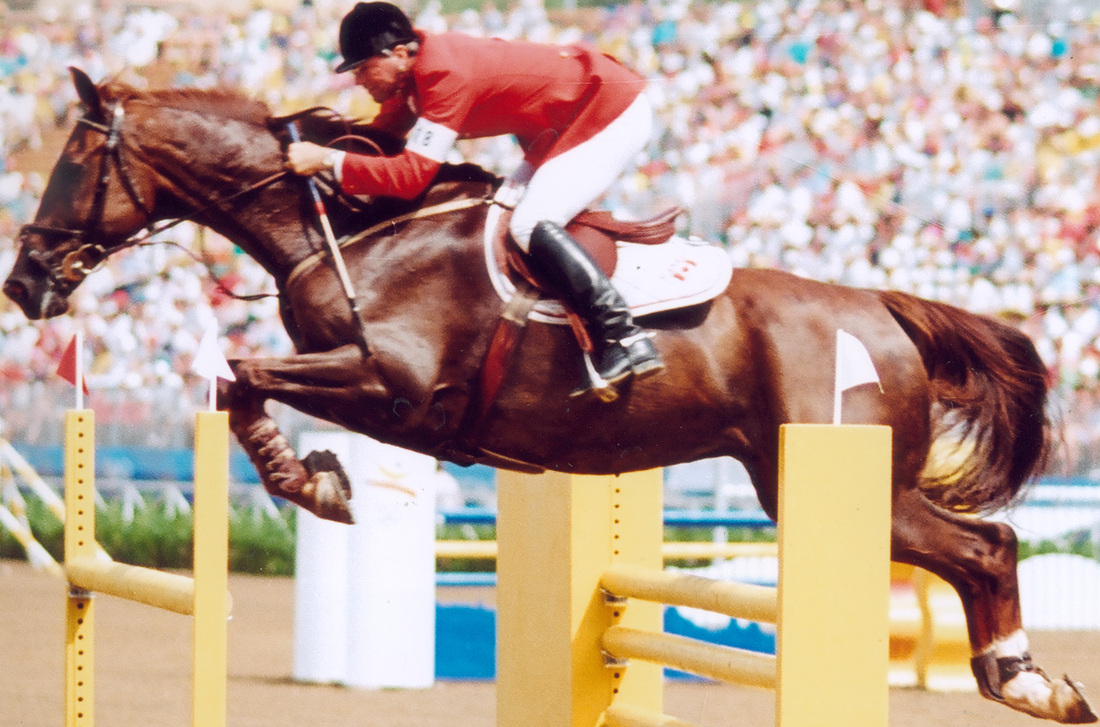
My cutout taken directly from the photo was my standard edge. I knew that, regardless of the third dimension, that all details had to match this pretty closely. It took a lot of staring at photos, a lot of measuring, to determine how far to offset the legs, establish hip bone placement, and even the width of the head. I roughed these dimensions in and mounted the legs onto the extensions. Now I could start gluing on Styrofoam. I don’t know how many boxes of hot glue I used. A lot. I had two guns on the go at all times.

Picture
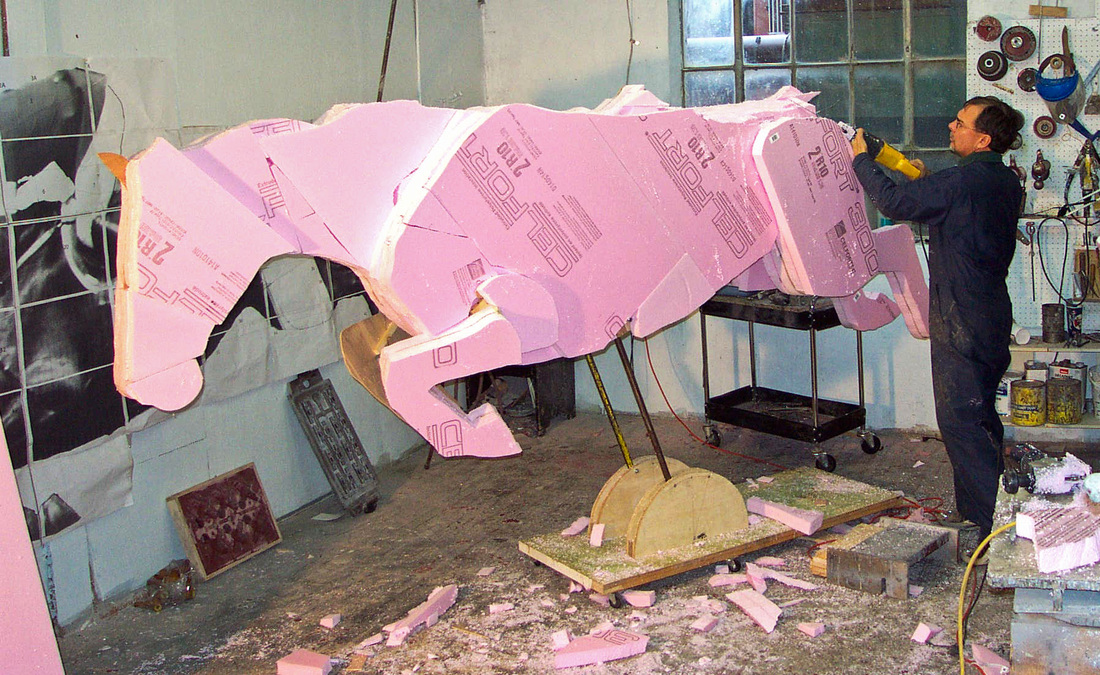
Most of the styro has been glued on. The plywood cutout is buried along the edges of the styro. If I cut into the wood at any time, I'd be cutting off part of Big Ben. I'm starting to use my recipro saw.
Did I mention that this was fun? It really was, building a horse. It probably took no more than a few days to go from the outline to the rough volume of Big Ben. It feels great to create this size of an object as directly as possible.

Next step was to grab saws, an electric chain saw, a recipro saw, and my 4 ½” grinder with 20-grit discs. All kinds of effort with large muscle groups, a few brain cells engaged, styro beads everywhere, especially in the corners of the eyes and in the underwear. Lots of noise, of sturm und drang. Some pauses, staring at photos, wondering what the heck was happening between skin and bone.
Picture
Big Ben tipped over to allow me to get at the back legs. I'll bet there are a few farriers out there that would love to have this feature built into real horses.
I didn’t pause very long to consider how I was going to learn equine anatomy in a week. Not knowing is a kind of special skill. I just blasted away until I couldn’t see any more what was going on. At that point, I melted a pail of cheap wax, hoping that a more reflective surface would reveal the true Big Ben lurking somewhere. It didn’t. It just made the studio smell bad for awhile.

I needed a miracle, I guess. Without knowing what I needed. One arrived.
Or two.

Continued in Part Three.

#22 Building Big Ben: a life-sized equestrian statue

10/7/2014

 
PART ONE: THE CHALLENGE

It used to be that the culmination of a sculptor's career was his chance to do full-sized horses in bronze. Since Roman times, every Tsar, Archduke and Admiral has placed himself on a horse on a pedestal. It's a meme, I guess. Just something you have to do when you control the lives of millions. Here are a few examples. There is a great slideshow of similar sculptures here.
The town of Perth, Ontario population 5840, was put on the map of international show jumping when Big Ben and Ian Millar started winning every prize available. Some years after Big Ben's death, Tony and Lynne Hendricks, local business people, organized the resources of the area residents to erect a life-sized bronze of Big Ben. They hired Artcast in Georgetown, Ontario, and Artcast hired me to create this piece.

Although I had heard of this pair, I would not have been able to pick them out of a lineup of any 3 horses. I was amazed when my buddy Bart riffled through a stack of horse images I'd downloaded and picked out a couple of Big Ben. It was my first bit of understanding what the equestrian world might look like. Still, not knowing what I didn't know, I forged ahead, hanging out with horses, sketching, studying, oblivious to the idea that some artists spend a career just studying equine physiolology.

The challenge, as I saw it, was the pose. The townspeople of Perth wanted Big Ben in full flight over a jump. This meant making a tonne of bronze fly. And a 'horse on a stick' was not going to fly.
Picture
Historically, equestrian sculpture has been limited by the weight and strength of materials. The older works featured horses with all 4 feet on the ground, or, perhaps supported by some unfortunate slave being trampled for the sake of supporting a lot of stone or bronze. In later years, internal structures could be built into the bronze shell to support a rearing horse.
I carved a quick little model of the pose and layered photos of it on top of a digital image of the jump. It took some weeks of conversations between the customer, the foundry and myself. Here's what the process looked like:
I had planned to support the sculpture on 1" diameter stainless steel rods welded to substantial pipe that represents the jump. Marcus at Artcast has long experience with this kind of engineering, and he gave the design the thumbs up.

A photo was available, one that caught Big Ben and Ian mid-flight over a jump, just what I needed to get a really accurate model for scaling all parts of the project. It's a very mechanical process at this point. Any deviation from the photo was going to be 'not Big Ben'. I was indebited to photographer Shawn Hamilton for supplying this photo. I would have been lost without it.
Picture
Big Ben, photo by Shawn Hamilton
Finally, I blew up Shawn's photo to full size, about 12 feet long (3.6m) so that I could get started. More in part 2! Whew, a bit tired just remembering. In the heat of the moment, though, on a project with this kind of visibility, there is no fatigue. Fear, excitement, focus, bewilderment, but no fatigue.
Stewart Smith in studio, working on Big Ben
Taping a number of tabloid-sized printouts together to make one big horse and rider.

#21: sometimes easy: simple projects, happy customers

9/7/2014

 
I have this long list in my "hall of shame" file, a hazard of custom work. There are many days, though, when the job simply gets done, no fuss, no great challenges. These are pleasant, the bank manager is happy. Challenge gets me out of bed, though, so there's a happy medium, somewhere. Since I'm working towards a 7 1/2 foot tall bronze man project today, I'll describe a happy, easy project.

For some time I've been a supplier to a site called Custom Made. They supply a place for the listing of odd projects of any description. Makers like me get listed as trusted suppliers. We look at job boards and quote on work. The site takes a small percentage to handle some of the trust factor, but the whole transaction happens directly between customer and supplier.

Shawn Broaddus, an interior designer and furniture designer near Atlanta, GA , wanted some custom cabinet pulls made for a credenza that she was building. She wasn't sure just what she wanted. She sent me a photo of a rough version of her project, and I sent back quick images from Rhino 3D:
Picture
I have overlaid an image of my first proposal of door pull. We went back and forth a few times on the design to get it right.
Picture
a first design
The job simply flowed along as if we'd done this for years. I sent a few more variations on this design, and it was set. Custom Made has a quoting system that works pretty well. I made the master pattern, got it cast, finished the castings, threaded the backs for holes and supplied brass bolts. Easy. I sent photos to Shawn:
stewart patterns cabinet pulls bronze
@stewartpatterns cabinet pulls custom bronze
Within the hour I had full payment via Paypal, and shipped these to Atlanta in about two days. Shawn sent back this photo fairly quickly, a happy customer. 
Picture
Custom cabinet by Shawn Broaddus, of B Design in Alpharetto, GA.
One of the great things about Custom Made is that the customer reviews are public, so prospective customers can see unbiased comments on projects, along with photos, etc. It all helps!

..., and, whew, not all projects are this easy. Hardly a day goes by when I'm not researching some technique or gizmo to help save my bacon. Today I discovered a pretty good looking 3D printer. I've tried to avoid expensive tools, preferring to job out this work, but this is getting tempting. I wasn't that long making the master pattern for Shawn's job, but this would have reduced the work to a few minutes. Hmm, maybe I have a few minutes to spare. Perhaps I love the smell of fresh wood, and don't love the smell of burning ABS?

#20: official crests, adding detail that only crickets will see

8/7/2014

 
I have done quite a number of official crests in low relief, all the way from the Canada Crest, to the RCMP, to family coats of arms. I will be given a drawing like this to work from:
Picture
I generate one leaf, copy it a number of times, then cut the copies up to fit around the circle. I carve the various elements like the deer and crown and add them to the pattern. The whole thing, perhaps 16" high, is to be cast in bronze. I have to keep metal thicknesses down to around 6mm, or 1/4". Not thicker. Not thinner. The letters are metal elements that I buy and stick on.
shilo crest for bronze casting
I spend lots of time with strong closeup glasses on, getting all the detail I can into the master. The pearls on the crown are cut into my copy mould.

 I have done so many crowns!  For years I saved all the moulds, hoping that one day I could reuse one. I never did. I threw most of them out when I downsized my studio a few years ago. These days, I would just draw one in CAD and get whatever size I needed cut CNC.

 If I had just known where this sort of work was going, perhaps I would have simply fudged some of this detail. When I found the plaque online, it appears to be on a giant sign in the middle of a field.
Picture
You see the bronze crest, right? This does seem to be visible only from perhaps 150 metres. Sigh
stewartpatterns.com
The entrance to CFB Shilo near Brandon, Manitoba.
I love the prairie! Endless skies, the Balm of Gilead poplar, even the razor-edged cold. But my bronze work here, with its great permanence, seems simply lost. Oh well, I guess I know that that delicate deer is playing somewhere in the plains with the antelope.

Memories in cast iron: selby house in toronto

23/6/2014

 
I have been making master tooling for historic cast iron structures for many decades.  Trystan Products of Ayr, Ontario has been a faithful customer since the early '80s. We have created benches, bollards, giant sculptures and lobsters in cast metals. Generally, we start with a photo of an historic structure, or a small drawing and proceed to develop a product.

A typical project was the restoration of an historic cast iron fence on Sherbourne St. in Toronto. We started with this photo from the front of Selby House, originally built by the Gooderham Distillery family:
Picture
This poor photo was all that was left of the original fence. The old mansion had been designated an historic property, so money was available to redo the fence from scratch. I made up a sample pattern full size in wood and met with a rather mixed group of concerned men. There was the provincial historical consultant, a federal guy, the fencing contractor, my customer, and perhaps one other mystery man. Everyone was gathered around the little photo and my sample, trying to make sure that his area of expertise was brought forward. The fencing contractor was rather impatient, wanting to get on with the job. The consultant's job seemed to be to hesitate for some length of time to indicate that he was thinking seriously. 

I'm not sure if there ever were wheels turning in that head. In the end, everyone said "ok" and I could relax. It was going to be hard to charge extra for random changes.

I used the sample to produce tooling for use in the foundry. This is where my involvement normally ends. I ship out a grey shape attached in various ways to a plywood sheet, and I'm done. If I've messed up, I'll run to the foundry and tweak the job to make it work. 

For this reason, I seldom see the final product, unless I travel some distance with a camera.  Here's what's visible on Google Street view:
Picture
It's been tough, cobbling together my self-taught skills to call myself any kind of an expert. Still, in the presence of 'suits', the only way to do business  is to act as if I'm an equal, speaking with authority on topics often well beyond my expertise. It's a great way to learn all kinds of things in a real hurry. 

a pewter medal, a bas relief in bronze

13/6/2014

 
Picture
It's a good thing I enjoy variety. I just got an order for a few hundred pewter medals, 40mm across, with a couple of medals plated in silver. The same job involves making a 35cm bas relief of the soldier and dog for a bronze plaque.

I will be working with a magnifying glass next week, instead of a hoist and pneumatic tools.
Picture
Here's the artwork for the medals. It's easy to get most of the detail by sending black and white art to Sterling Marking in London, ON. They will send back a rubber engraving with black detail precisely raised from the white background. I'll work with my plastics to create the master pattern. The man and dog will have to be carved separately, hence the magnifying glass.  The man's head will be about 4mm high. Not much room for expression there.

Still, I will be casting these into silicone rubber, so I'll pick up all the detail that I can carve. Here's an older medal I made:
Picture
I will update this project as I move forward. Meantime, there's big stuff to get out of the studio and off to the painter. And there's cleanup, sigh. That's just not my forté.

custom bronze door pull

1/6/2014

 
A law office in Dallas, TX wanted a custom bronze door pull for a board room. Working with the interior designer Kathleen Mowry, we came up with an approved design for double glass doors, splitting the logo in half, and figuring out size, weight, finish and mounting hardware of the design. 
Picture
Picture
I use Rhino 3D v5 to generate designs, weights, centre of gravity, etc. Once the design is set, I can render it in Rhino Flamingo for illustration. The finalized design was sent to my CNC guy to create the beginning of the master pattern.  This is the rendering to show context:

Picture
and this is the casting, finished. Note that I added a 'hammered' texture on the surface. I carved this into the master, as there is no Hammering 6mm bronze! 

I do hope to get a photo from the installed work in the near future.
Picture

Green Man in Bronze

1/6/2014

 
Picture
 A fellow in Missouri saw my Green Man masks in bronze that I made in the early 00's and asked if I could make something similar. Once we determined the design, I sketched this out in clay, full size at 38cm (15") high. He wanted a few berries added, and I knew he liked bees, so we wound up with this:

Picture
Picture
About 5kg (11 lb) in bronze, with mounting holes top and bottom. 

    stewart smith

    I'm a woodcarver, turned sculptor, and morphed into a pattern-maker for cast metals. These days I hesitate to define my work, avoiding words like 'artist' or 'craftsman'. I just love designing and making things, keeping a bit of time free to downhill ski, paddle my kayak, and sing with my fellow choristers.

    Stewart Smith
    Stewart Patterns
    New Hamburg, On 
    email stewsnews@gmail.com

    Archives

    November 2014
    August 2014
    July 2014
    June 2014

    Categories

    All
    Bronze Tile
    Cast Aluminum
    Cast Bronze
    Cast Iron Restoration
    Cast Metal Design
    Custom Bronze Door Pull
    Custom Cast Bronze
    Custom Cast Hardware
    Custom Medals
    Digital Sculpture
    Historic Restoration
    Hollywood
    Margaret Atwood
    Memorial Bronze
    Mestrovic
    New York Parks
    Pewter Casting
    Sculpture

    RSS Feed

Powered by Create your own unique website with customizable templates.